There is an earlier post I have put up for Sathu Maavu Ganji Recipe (Multi-cereal Health Mix porridge). This post is related to that…. After I started making this porridge powder for my son, I realized that I was getting some things into my pantry like Jowar, Bajra etc which I would not normally use otherwise. The issue is that I do not get very small quantities of this at my grocery store and I land up with a lot of it being left over after I prepare the porridge powder.
So I decided to start making a very healthy Thalipeet powder. Thalipeet is a popular Maharashtrian dish and is made out of a flour called Bhajani which is a multi-grain powder.
Similar to what I did with the Ganji powder, I decided to sprout the cereals in this recipe too. It is extremely nutritious, flavourful and tasty too!
Ingredients –
- Red rice – 1 kg
- Channa Dal – 2.5 cups
- Urad dal – 1 cup
- Sprouted Moong dal (green gram) – 1.5 cup
- Sprouted Jowar – 1.5 cup
- Sprouted Bajra – 1.5 cup
- Sprouted Ragi – 1.5 cup
- Corn – ½ cup
- Wheat – 2 handful
- Poha – 2 handful
- Dhania – 1 handful
- Jeera – 1 handful
- Cinamon – 1 handful
- Black pepper -1 handful
- Cloves – 1 handful
Procedure –
– Out of the above ingredients
- Raagi, Bajra, Jowar – Wash each separately in water and soak for 2 days and tie in muslin cloth for 2 days in a dark place for sprouting. Then dry in shade till completely dry.
- Green gram(Moong) – Wash in water and soak for 1 days and tie in muslin cloth for 1 days in a dark place for sprouting. Then dry in shade till completely dry.
- Red rice, Wheat – wash and dry in shade till completely dry.
Rest of the ingredients use as-is.
– Mildly Dry roast all of the above ingredients one by one.
– Mix all the ingredients and blend into a fine powder – if you are in India, you can do this in the flour mill.
Once powdered, your Bhajani powder is ready. If stored in an airtight container in a dry place, this can be kept for 3 months.
Thalipeet Recipe
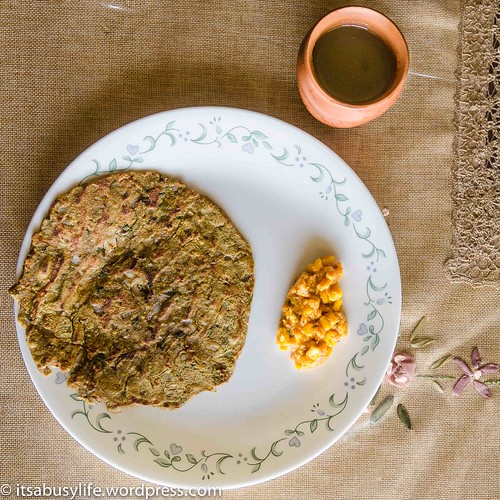
Thalipeet
Thalipeet can be prepared with this flour –
– Take a cup of flour in a mixing bowl
– Add chopped onions, coriander, finely chopped green chillies
– Add a tablespoon of cooking oil
– Salt to taste
– Pour water little by little and knead into a soft dough
– Divide the dough into small balls (like you do for chappathis).
-Place this on a banana leaf/plastic sheet/butter paper smeared with some oil.
– Using your hand, pat it to make round flat breads (use water so that it does not stick to your hand). This is similar to what you would do for Akki roti/raagi roti.
– Transfer this to a heated tava and roast on both sides with a little oil. (If you try to skip the oil, it would be too dry.). The thinner you have made it the crispier it will be!
Tips :
1) Note that these will not be easy to roll and transfer like the chappathi dough as the dough will not be too elastic. You can use some wheat flour for dusting.
2) To make the dough easier to work with, you can add some wheat flour while kneading it.
3) This Bhajani flour can also be mixed with dosa batter.
4) Serve it with some yoghurt, pickle, chutney or any other side dish of your choice.
5) You can add vegetables (grated carrots, mooli, boiled mashed potatoes) as required like you do for parathas.
IMPORTANT – Keeping the Bhajani flour for too long gives it a bitter taste!
Eat it hot as it is best-tasting directly out of the tava 🙂 Great for a nice heavy breakfast/sunday brunch!

Thalipeet Dosa style
Try this and let me know how it turns out….


